|
|
||
|---|---|---|
| .woodpecker | ||
| assets | ||
| build_results | ||
| public | ||
| src | ||
| start_results | ||
| test | ||
| .dockerignore | ||
| .gitignore | ||
| bench_results.nu | ||
| benchmark.md | ||
| benchmark.nu | ||
| bun.lockb | ||
| Dockerfile | ||
| package-lock.json | ||
| package.json | ||
| README.md | ||
| rsbuild.config.ts | ||
| size_comparisons.md | ||
| size_comparisons.nu | ||
| startup_bench.nu | ||
| tsconfig.json | ||
Pour la version en français, c'est ici: Français
English
You can pull these images from my public repository and try them out !
All the images I built during this project are available on my public repository that you can find in the Packages section of my Frgejo instance.
You can run the following command to pull the disastrous 2.03 GB image for example:
docker pull forgejo.transprot.eu/public/react-simple
Then you can use the following command to run the image you just pulled:
docker run -d -p 80:3000 --name react-simple react-simple
You'll then have access to the deployed basic app at the following address: http://localhost:80
How to reduce the size of your docker 🐳 images 💿?
We're starting from a basic React application générated with a simple Dockerfile with disastrous conséquences:
FROM node:18
COPY . .
RUN npm install
EXPOSE 3000
CMD ["npm", "start"]
For your information, the image weight a whopping 2.03GB 🤯 !!!!! A mountain 🏔️ of data for a simple web application that is empty at the moment!!!
You can test it yourself by first running the following command:
npm install
Then run the following command to build the docker image:
docker build -t 'react-simple' .
You can inspect your images and verify the size yourself with the following command:
docker image ls
I use Nushell and rigrep to filter only on the image in question using the following command:
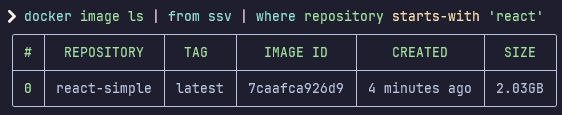
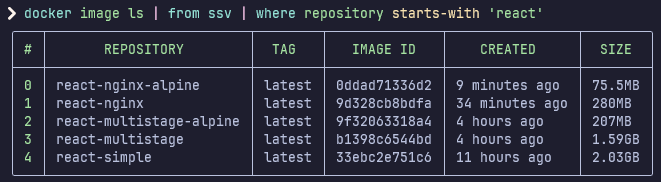
docker image ls | from ssv | where repository starts-with 'react'
Here's the result of running this command that shows how shamefully big the image is:
First optimisation: using a .dockerignore file and multi-stage build
The first optimization that we can do is using a .dockerignore file. Just like a .gitignore file, a .dockerignore file allows us to exclude file and folders that we don't want to include in the docker image that we are building.
Here's the .dockerignore file that I added to this simple project to mainly exclude the dark hole that node_modules are node_modules:
node_modules
npm-debug.log
Dockerfile
.dockerignore
.git
.gitignore
build
assets
In our context, this command only optimizes the build time and not the build size, as the 309 MB that the node_modules folder occupies are not needed to build the docker imagen but as we run the npm install command in any case inside the Dockerfile, this folder is generated and included from inside the Dockerfile.
A better optimisation of the image is to use multi-stage build. Multi-stage builds allows us to include only what is necessary to run the image, and to not include the build files or node_modules for example.
Here's the new version of the Dockerfile using multi-stage build:
# Build stage of the application
FROM node:18 AS build
WORKDIR /app
COPY package*.json ./
RUN npm install
COPY . .
RUN npm run build

# Production stage to run the application
FROM node:18 AS production
COPY --from=build /app/build /prod
RUN npm install --global serve
EXPOSE 3000
CMD ["serve", "prod/"]
You can run the following command to build the image:
docker build -t 'react-multistage' .
I am still usig Nushell on my end to have a pretty print and filter on the images that I want which gives me the following output:
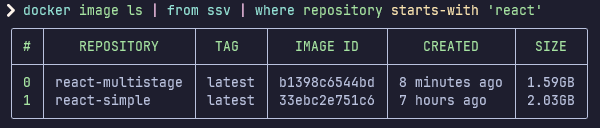
The image now weighs 44 MB less, which is 1.27 times smaller, and a whopping 21.67% reduction in size!
Second optimisation: using alpine images
Alpine images are based on the Alpine Linux distro, which is a minimalistic and light weight version of Linux. It's realle stupid and simple, but if your images are built using a small base image, your resulting image will also be small !
It's as easy as adding -alpine on your images in your Dockerfile.
Here's the new version of the Dockerfile using an alpine image of node:
# Build stage of the application
FROM node:18-alpine AS build
WORKDIR /app
COPY package*.json ./
RUN npm install
COPY . .
RUN npm run build

# Production stage to run the application
FROM node:18-alpine AS production
COPY --from=build /app/build /prod
RUN npm install --global serve
EXPOSE 3000
CMD ["serve", "prod/"]
You can rebuild the image by running the following command:
docker build -t 'react-multistage-alpine' .
And as always, I'm using Nushell to have a prettier output, which gives me the following results which are incredibly impressive:
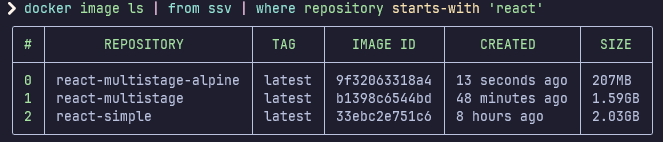
A size reduction of 1.82 GB, which is an image that is 9.8 smaller than the first one and is equivalent to a size reduction of 89.8% !!!!
And the best in all of this ? Not only is the image smaller, but it is way more performant as it only includes what is necessary to run the application on the alpine version of node.
But we can go even further beyond in optimizing this image.
Third optimization: Using a better http server: Nginx
The next optimization that we can perform is using a nginx server instead of a node server to run our application. This will serve the static build files faster than the node server and it will also be better perfomance, memory and requests wise as node performs worse than nginx to serve files under the same conditions.
Here's the updated Dockerfile to do so:
# Build stage of the application
FROM node:18-alpine AS build
WORKDIR /app
COPY package*.json ./
RUN npm install
COPY . .
RUN npm run build

# Production stage to run the application
FROM nginx AS production
COPY --from=build /app/build /usr/share/nginx/html
EXPOSE 80
CMD ["nginx", "-g", "daemon off;"]
You can run the following build command to generate the image:
docker build -t 'react-nginx' .
To run this image, you will need to run the following command:
docker run -d -p 80:80 --name react react-nginx
But there's a tiny problem with this solution, this only optimizes the perfomance of the image but the size of the regular Nginx server is bigger than the Node Alpine version.
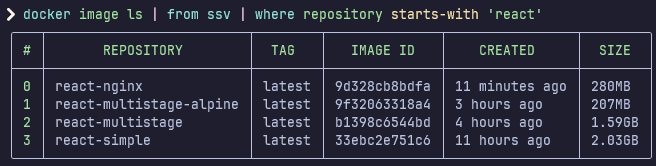
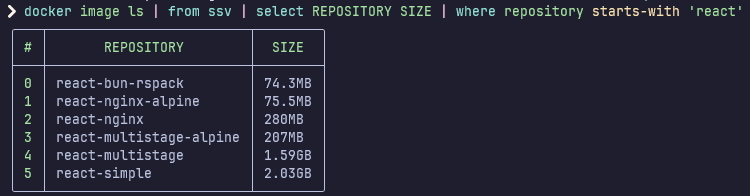
Here's an image showing the size of all the images so far:
Fourth optimization: The obvious, Nginx Alpine
The size of the regular Nginx server maybe be bigger than the Node Alpine version, but that's not really a fair comparison.
So to keep this fair, we'll also use the Nginx Alpine version to build the application.
Here's the updated Dockerfile to do so:
# Build stage of the application
FROM node:18-alpine AS build
WORKDIR /app
COPY package*.json ./
RUN npm install
COPY . .
RUN npm run build

# Production stage to run the application
FROM nginx:stable-alpine AS production
COPY --from=build /app/build /usr/share/nginx/html
EXPOSE 80
CMD ["nginx", "-g", "daemon off;"]
You can run the following build command to generate the image:
docker build -t 'react-nginx-alpine' .
Here's an image showing the size of all the images so far:
The image now weighs 1 954,5 MB less, which is 26,88 times smaller, and a whopping 96,28% reduction in size!!!!! And with better perfomances of the server to top it off!!!
Fifth optimization: Using a modern toolchain: RsBuild, Bun
The blank application generated by default using the command on their website uses WebPack under the hood to build the application.
RsPack is a Rust rewrite of WebPack, and RsBuild is a build tool based on RsPack.
You can find how to generate a React application by following this guide.
For the sake of this demonstration, I decided to delete the whole default React app generated by the create-react-app and use the command in the guide I listed above.
Bun is a fast JavaScript Runtime and is faster than npm (and other package managers) to install dependencies.
This is what the Dockerfile now looks like:
# Build stage of the application
FROM oven/bun AS build
WORKDIR /app
COPY . .
RUN  bun i && bun run build

# Production stage to run the application
FROM nginx:stable-alpine AS production
COPY --from=build /app/dist /usr/share/nginx/html
EXPOSE 80
CMD ["nginx", "-g", "daemon off;"]
You can run the following command to build the image:
docker build -t 'react-bun-rspack' .
Here's an image showing the size of all the images so far:
We even have a slight improvement in the final size, a whopping 1.2 MB less than the previous iteration, and a reduction of 1 955,7 MB of difference with the first image, which is 27.32 times smaller and a reduction of 96,33% in size!!!!!
But again, this optimization is mainly to speed up the package installation time and build time of the react application, which in turns speeds up the docker build.
Sixth optimization: Probably the last one, using distroless images
The very sixth (and probably the last optimization I can think of): distroless images.
Distroless images are more secure by diminishing the attack surface for potential vulnerabilities and lighter, containing only the necessary dependencies to run your application. This means no shells, no package managers or any other program usually found in a Linux distro.
There's many people trying to make distroless images of popular tools, and you can find some starters and even build some yourselves by looking at the necessary dependencies of the images you use.
I have been using Chainguard which has a great image repository where you can find many popular images in distroless.
This is what the Dockerfile now looks like:
# Build stage of the application
FROM oven/bun AS build
WORKDIR /app
COPY . .
RUN  bun i && bun run build

# Production stage to run the application
FROM cgr.dev/chainguard/nginx AS production
COPY --from=build /app/dist /usr/share/nginx/html
EXPOSE 8080
ENTRYPOINT ["nginx", "-g", "daemon off;"]
You can build the image running the following command:
docker build -t 'react-nginx-distroless' .
And here's the image size now:
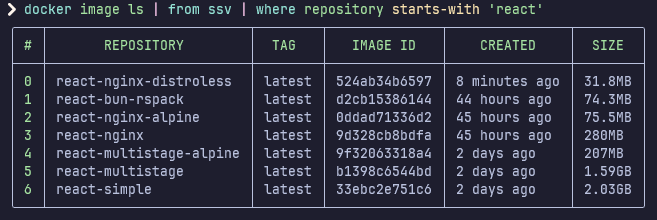
This is the biggest optimization in image size to date! A 1 998,2 MB less than the original image, which is a crazy small image, 63,83 times smaller than the original!!! It's a ridiculous 98,43% reduction in size! And our application is much more secure !!!!!
I personally love distroless images. I've seen people say that you can debug them less, and not having basic tools like a shell is contraining, but I personally think it's not needed. You can simply build both a distroless and alpine image of your same code, then when there's a need to debug, scitch the container image for the alpine version. Or even better, use distroless images in production environments and alpines in development environments.
Seventh Optimisation: slim docker images
I've come across one (probably last optimisation I can find out there). It's the use of the slim tool. It allows you to minify your docker images without even changing them ! Beware though, you need to absolutely know what is to include and not, or else you might have some files not detected at runtime during the slim image generation which can reduce your app's capabilities.
Here's the lists of commands I ran to mignify all the images built up until now:
slim build --target react-simple --tag react-simple:slim
slim build --target react-multistage:latest --tag react-multistage:slim --include-path /prod
slim build --target react-multistage-alpine:latest --tag react-multistage-alpine:slim --include-path /prod
slim build --target react-nginx:latest --tag react-nginx:slim --include-path /usr/share/nginx/html
slim build --target react-nginx-alpine:latest --tag react-nginx-alpine:slim --include-path /usr/share/nginx/html
slim build --target react-bun-rspack:latest --tag react-bun-rspack:slim --include-path /usr/share/nginx/html
slim build --target react-nginx-distroless:latest --tag react-nginx-distroless:slim --include-path /usr/share/nginx/html --include-path /var/lib/nginx
I've listed the images in the same order as they were created in this guide.
Here's an explanation as to why some need an --include-path attribute.
This is the perfect example to illustrate slim and it's complexity. To simplify, slim runs a docker container of the image you try to mignify, then tests different crawlers against it, such as http requests, finds all the files that are to keep and keeps them.
I can't completely say how it works for sure, as I need more time to learn how it works under the hood, but that's as far as I gathered.
Now here's the problems I've ran into trying to mignify some docker images. The first ones where I ran into problems were the multistage versions, using npm serve under the hood. The problem came from the files that weren't loaded right away by the slim http crawlers, such as the icon of the CRA default React App (RIP in peace to CRA btw). So what would happen is that the image is generated without any issue, but the assets weren't included in the final slim image.
To avoid this, you need to know how your images work and what they need to run properly. For me it was the /prod folder that needed to be included in the case of the react-multistage and react-multistage-alpine.
The same thing happened with the nginx images, where all needed to keep the default html folder that I populated with the build react app. For the Chainguard nginx image, some additional folders needed to be kept as they were completely ignored by default, giving me errors about missing files and folders.
Here's the final result of the slimmed images and their size reduction in percentage and times wise compared to the react-simple image: size_comparisons.md
Benchmark of build times using docker build --no-cache
Here's the link to the result of the benchmark made to recreate the image 10 times for each branch that contains each optimization: benchmark.md
The nushell script used to generate this benchmark is benchmark.nu.
You can execute the following command to run the build 100 times on each branch:
nu benchmark.nu 100
By default the script runs 5 builds.
The build results can be found in the folder build_results in csv format.
Each branch that was benchmarked has a file associated named like simple-dockerfile.csv for the simple-dockerfile branch.
Français
Vous pouvez utiliser ces images et les pull sur votre machine pour les testes via mon repository publique !
Toutes les images que je construis durant ce projet sont disponible sous l'onglet Packagesde mon instance de forgejo.
Vous pouvez par exemple lancer la commande suivante pour télécharger l'image simple qui pèse un désastreux 2.03 GB:
docker pull forgejo.transprot.eu/public/react-simple
Vous pouvez ensuite lancer cette image avec la commande suivante :
docker run -d -p 80:3000 --name react-simple react-simple
Ce qui vous donnera accès à l'application basique à l'adresse suivante : http://localhost:80
Comment réduire la taille de vos images 💿 docker 🐳 ?
On part d'une application React tout juste généré et avec un Dockerfile simple mais avec de grosses conséquences :
FROM node:18
COPY . .
RUN npm install
EXPOSE 3000
CMD ["npm", "start"]
Pour indication, l'image qui en résulte pèse environ 2.03GB 🤯 !!!!! Une montagne 🏔️ de données pour une simple application web vide pour l'instant !!!
Vous pouvez le testez vous même en lançant d'abord la commande suivante:
npm install
Puis en lançant la commande suivante pour builder l'image:
docker build -t 'react-simple' .
Vous pouvez inspecter la taille de votre image avec la commande suivante:
docker image ls
J'utilise personnellement Nushell et rigrep pour ne filtrer que sur l'image en question:
docker image ls | from ssv | where repository starts-with 'react'
Voici un aperçu de ce que cette commande m'affiche avec le poids de l'image assez désastreux:
Première optimisation: utilisation de .dockerignore et multi-stage
Une des première optimisation que l'on peut faire est d'utiliser un fichier .dockerignore. Tout comme un fichier .gitignore, le fichier .dockerignore permet de ne pas include certains dossiers ou fichier qui ne sont pas nécessaire pour l'image que l'on construit.
Voici le .dockerignore que j'ai rajouté à ce simple projet pour notamment éviter d'inclure le trou noir qu'est le dossier node_modules:
node_modules
npm-debug.log
Dockerfile
.dockerignore
.git
.gitignore
build
assets
Cependant, ce que cette commande optimise est le temps du build de l'image, car les 309 MB qu'occupe actuellement ce dossier ne sont pas nécessaire à inclure dans l'image lors du build de celle-ci, mais comme nous lançons la commande npm install dans tous les cas dans le Dockerfile, ils sont réinstallé et ré-inclut dans l'image.
Une meilleure optimisation de l'image est d'utiliser le multi-stage build. Le multi-stage build permet de n'inclure que ce qui est nécessaire pour exécuter votre programme et de ne pas inclure les fichier de build ou les node_modules par exemple.
Voici la nouvelle version du Dockerfile découpé en multi-stage:
# Build stage of the application
FROM node:18 AS build
WORKDIR /app
COPY package*.json ./
RUN npm install
COPY . .
RUN npm run build

# Production stage to run the application
FROM node:18 AS production
COPY --from=build /app/build /prod
RUN npm install --global serve
EXPOSE 3000
CMD ["serve", "prod/"]
Vous pouvez lancer la commande suivante pour construire l'image:
docker build -t 'react-multistage' .
Pour ma part j'utilise toujours Nushell pour avoir cette belle présentation des résultats filtré:
L'image pèse maintenant 44 MB de moins, on a une image 1.27 fois plus petite, soit une diminution de la taille de 21.67% !
Deuxième optimisation: utilisation d'images alpines
Les images alpine sont basé sur la distro Alpine Linux qui est une version minimale et peu volumineuse de Linux. C'est tout bête, mais si l'image de base de votre image est petite, votre image finale le sera aussi !
C'est tout aussi simple que de rajouter -alpine sur vos image docker dans le Dockerfile.
Voici la nouvelle version du Dockerfile:
# Build stage of the application
FROM node:18-alpine AS build
WORKDIR /app
COPY package*.json ./
RUN npm install
COPY . .
RUN npm run build

# Production stage to run the application
FROM node:18-alpine AS production
COPY --from=build /app/build /prod
RUN npm install --global serve
EXPOSE 3000
CMD ["serve", "prod/"]
Puis vous pouvez reconstruire l'image en lançant la commande suivante:
docker build -t 'react-multistage-alpine' .
Et comme d'habitude, j'utilise Nushell pour avoir un meilleur rendu visuelle, et voici les résultats qui sont impréssionnants:
On a une réduction de 1.82 GB, soit une image 9.8 fois plus petite et une réduction de 89.8% !!!!
Et le meilleur dans tout ça ? Non seulement l'image est plus petite, mais elle est plus performante car elle ne contient que le strict minimum nécessaire pour faire tourner node via la version alpine.
Mais on peut encore aller plus loins dans l'optimisation.
Troisième optimisation : Utilisation d'un meilleur serveur http: Nginx
La prochaine optimisation que l'on peut effectuer est l'utilisation de Nginx comme serveur pour servir notre application React plutôt que Node. Les fichiers statiques construits de notre application seront envoyés aux utilisateurs plus rapidement, et le serveur utilisera moins de mémoire , performera mieux et pourra traiter plus de requête que le serveur node car nginx est plus performant sous des conditions similaires.
Voici à quoi ressemble notre Dockerfile à présent:
# Build stage of the application
FROM node:18-alpine AS build
WORKDIR /app
COPY package*.json ./
RUN npm install
COPY . .
RUN npm run build

# Production stage to run the application
FROM nginx AS production
COPY --from=build /app/build /usr/share/nginx/html
EXPOSE 80
CMD ["nginx", "-g", "daemon off;"]
Vous pouvez lancer la commande suivante pour construire l'image:
docker build -t 'react-nginx' .
Pour démarrer un conteneur, vous pouvez lancer la commande suivante:
docker run -d -p 80:80 --name react react-nginx
Mais il y a un petit hic avec cette solution, l'image est plus performante mais plus volumineuse, étant donnée que l'image classique de Nginx est plus volumineuse que celle de Node Alpine.
Voici une image de la taille de nos images docker jusqu'à présent :
Quatrième optimisation: l'évident, Nginx Alpine
La taille de l'image classique de Nginx est plus grosse que celle de Node Alpine, mais ce n'est pas vraiment une comparaison équitable.
Pour rendre cette situation plus équitable, nous allons utiliser la version Alpine de Nginx.
Voici à quoi ressemble notre Dockerfile à présent:
# Build stage of the application
FROM node:18-alpine AS build
WORKDIR /app
COPY package*.json ./
RUN npm install
COPY . .
RUN npm run build

# Production stage to run the application
FROM nginx:stable-alpine AS production
COPY --from=build /app/build /usr/share/nginx/html
EXPOSE 80
CMD ["nginx", "-g", "daemon off;"]
Vous pouvez lancer la commande suivante pour construire l'image:
docker build -t 'react-nginx-alpine' .
Voici une image de la taille de nos images docker jusqu'à présent:
L'image pèse 1 954,5 MB de moins que celle de départ, ce qui est 26,88 fois plus petit, et une énorme reduction 96,28% de la taille de l'image !!!!! Et pour couronner le tout, avec de meilleur performances !!!
Cinquième optimisation: Utiliser une toolchain moderne: RsBuild, Bun
L'application blanche généré par défault via la commande donnée par le site de React officiel utilises WebPack pour construire l'application.
RsPack est une ré écriture en Rust de WebPack, et RsBuild est une chaîne de build basé sur RsPack.
Vous pouvez trouver la commande pour générer une application React via en suivant ce tutoriel.
Pour cette démonstration, j'ai décidé de supprimer l'application blanche généré via la commande create-react-app et d'utiliser la commande du tutoriel juste au dessus pour regénérer une application avec RsBuild.
Bun est un runtime performant et rapide de JavaScript et il est plus rapide que npm (et d'autre package manager) pour installer des dependencies.
Voici le Dockerfile à présent:
# Build stage of the application
FROM oven/bun AS build
WORKDIR /app
COPY . .
RUN  bun i && bun run build

# Production stage to run the application
FROM nginx:stable-alpine AS production
COPY --from=build /app/dist /usr/share/nginx/html
EXPOSE 80
CMD ["nginx", "-g", "daemon off;"]
Vous pouvez construire l'image avec la commande suivante :
docker build -t 'react-bun-rspack' .
Voici une image de la taille de nos images docker jusqu'à présent:
On a même une taille plus réduite de l'image avec une amélioration drastique de l'image final qui pèse maintenant 1.2 MB de moins que l'image précédente, avec une différence de 1 955,7 MB par rapport à la première image, ce qui est 27.32 fois plus petit et une réduction de 96,33% de la taille !!!!!
Mais pour réitérer, le but de ces optimisations est d'installer les dépendances et de construire l'application React plus rapidement, ce qui réduit le temps de construction de l'image docker par conséquence.
Sixième optimisation: Probablement la dernière, utilisation des images distroless
La sixième (et probablement la dernière optimization à laquelle que je peux penser): les images distroless.
Les images distroless sont plus sécurisé en diminuant la surface d'attaque de vos applications car elles ne contiennent que le strict minimum de dépendances pour éxecuter votre application. Ce qui veut généralement dire pas d'invite de commande, de package managers et d'autres programmes généralement disponible dans les distros Linux.
Beaucoup de gens s'essayent à construire des images distroless d'outils bien connus, et vous pouvez vous-même en construire en regardant le strict nécessaire pour faire tourner vos images applicatives.
J'ai commencé à utiliser Chainguard qui a une grande selection d'image dans leur repository où vous pourrez trouver des images populaires en distroless.
Voici le Dockerfile à présent:
# Build stage of the application
FROM oven/bun AS build
WORKDIR /app
COPY . .
RUN  bun i && bun run build

# Production stage to run the application
FROM cgr.dev/chainguard/nginx AS production
COPY --from=build /app/dist /usr/share/nginx/html
EXPOSE 8080
ENTRYPOINT ["nginx", "-g", "daemon off;"]
Vous pouvez construire l'image avec la commande suivante :
docker build -t 'react-nginx-distroless' .
Et voici la taille des images juste ici :
C'est la plus grosse optimisation de taille jusqu'à présent ! Une différence de 1 998,2 MB de moins que l'image original, c'est 63,83 fois plus petit!!! C'est une réduction folle de 98,43% ! Et le meilleur dans tout ça? L'application est beaucoup plus sécurisé !!!!!
Personnellement j'adore les images distroless. J'ai vu certaines personnes dire qu'elles sont moins débuggable en n'ayant aucun outil basique comme un bash mais je pense que ce n'est pas nécessaire. Vous pouvez tout simplement construire une image alpine et distroless de votre application, puis remplacer votre image distroless par l'alpine pour débugger en cas de bug. Ou encore mieux et ce que je fais personnelelement, utiliser une image alpine en environnement de développement et distroless en production.
Benchmark temps de build avec docker build --no-cache
Voici le lien du benchmark réalisé pour chaque branche en lançant la construction des conteneurs 10 fois: benchmark.md
Le script nushell pour générer ce benchmark se trouve dans benchmark.nu
Vous pouvez l'exécuter en lançant la commande suivante, pour lancer 100 build de chaque docker:
nu benchmark.nu 100
Par défaut le script lance 5 build de chaque image.
Les résultats de build peuvent être trouvé dans le dossier build_results sous le format csv.
Chaque branche qui a été benchmarké possède un fichier associé sous nommé par exemple simple-dockerfile.csv pour la branche simple-dockerfile.